Sib VDL Readme – 12 – – Inputting Notes

Inputting Notes

With A Keyboard

Most people find the easiest way to input notes into the score is to use a MIDI keyboard that is attached to their computer. When you type in a pitch on your MIDI keyboard, Sibelius will correctly and automatically input the notehead which corresponds to that sound and it will be placed in the correct location on the staff.

Once you have entered notes that have articulations assigned to them, you will then have to add the corresponding articulations so the program knows which sounds to trigger in Kontakt Player. You can also add them as they’re being entered, just depends on which way you like to work.

The keymaps and Input Maps specifically designed to be used with this Template are in the included file labeled VDL_Maps_7.0a.pdf. These maps not only show you where to access the sounds in relation to a MIDI keyboard, but they also contain the Template Dictionary Items, notehead variations, and articulations (if necessary) that you will need to know when using a MIDI keyboard for note input. Read the instructions in that file for more information.

Without A Keyboard

If you choose to not use a MIDI keyboard, you can enter notes manually and edit the notehead numbers and/or staff placements afterwards so they reflect the assignments defined in the mapping diagrams. Or better yet, the octave number listed on every C key of each Input Map can be used as a reference of where to click Sibelius’ built-in keyboard to get the same input results as if you were using a plugged in MIDI keyboard.

Entering Modwheel Changes & Keyswitches

You won’t have to manually enter controller changes or keyswitches. The Dictionary Items, sound set and applicable percussion mappings will handle all these switches for you.

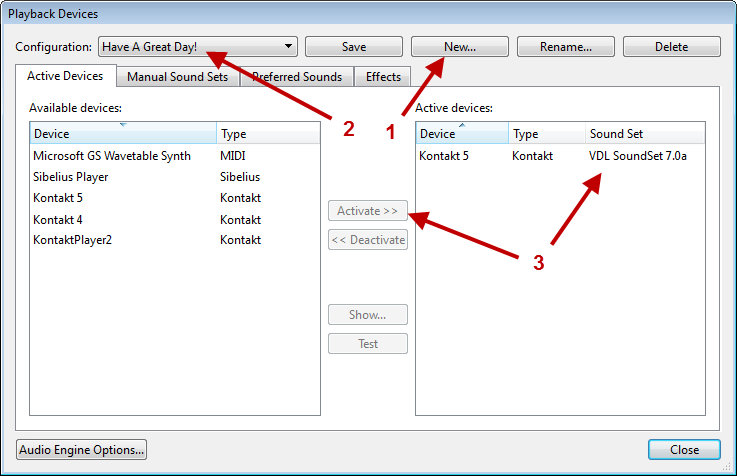
Again, the sound set is an important part of how all this is designed to function. Make sure the correct one is assigned in your Playback Configuration.

Changing Noteheads

The TenorLines and BassLines have various sets of sounds that are mapped onto one MIDI pitch. In the old days, you would have needed to use a MIDI message in the score to move the modwheel to get the various sounds. Today, thankfully, there’s an easier way. All you have to do is change the notehead to the correct number for the sound you want displayed and played back.

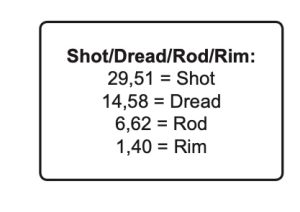
The Input Maps where this idea is applicable have reminder charts, like the one just above, otherwise you can view all this in the diagrams. The simplest way to change a notehead is to use the shortcut key Alt+Shift+noteheadnumber on Windows, or Option+Shift+noteheadnumber on Mac.

Input Variables

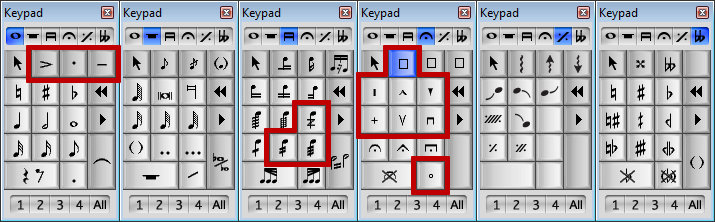
When you come across a diagram that has bracketed notes (as seen in the example below), these indicate sounds with Input Variables. An input variable allows you the option to choose different input methods to achieve the same result for certain sounds. When you see Input Variables within the mapping diagrams, the first note displayed will not have an articulation (could be yellow highlighted though). Any subsequent notes will have articulations.

Depending on how you prefer to work, this feature gives you added flexibility when inputting music and may not require as much need to alter notehead numbers when working with or without a MIDI keyboard.

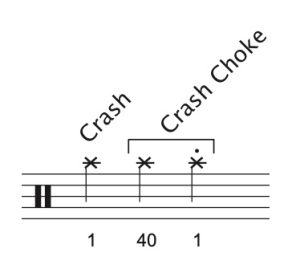
The example to the left is from a Cymbals instrument. Say you enter notehead #1 into your cymbal part to get the “crash” sound, but you then change your mind and decide to go with a “crash choke.” Rather than changing the note to notehead #40 (which you can still do if you’d like) simply add a staccato onto your previously entered notehead #1. Voila! Insta-choke!

Not all of the Input Variables function quite the same way, but as you work with the mapping diagrams, you’ll start to get a feel for the designed functionality. These variables are reflected in the input maps as well.

IMPORTANT NOTE: Keep in mind, when using a MIDI keyboard, the resulting notehead entered will be the first one you see listed within the bracketed Input Variables. Subsequent noteheads within the bracket illustrate how applying an articulation can alter the sound on a note using a more commonly or already used notehead.

Here’s an Input Map and Diagram example from the Maps file:

Sib VDL Readme – 11 – – Naming Convention

Naming Convention

Every Kontakt patch in the VDL 2.5.5 library has a corresponding instrument defined within the VDL Template*. If you open the Instruments window (shortcut: I) and click to get the Ensemble drop down list, you’ll see that there is an ensemble called “– VDL Template 7.0a”. Within that ensemble are various “Families” containing different categories of VDL instruments. This should all be pretty self-explanatory.

Once you’ve assigned instruments to your score, or if you do instrument changes mid-staff, you can view which instrument is loaded if you have View > Invisibles > Hidden Objects checked. By viewing Hidden Objects, you’ll see that the instruments (or instrument changes) in your score will display the hidden text which will in turn give you an indication as to which Ensemble it’s a part of.

The grayed out (hidden) text will not appear in the printed score. However, you may wish to deactivate Hidden Objects prior to printing, or put a line break into your staff names so the hidden portion of the instrument name doesn’t affect the spacing between the staff name and the left bar line.

* Well, not quite all. Here’s the list of NKI patch files that do not have an instrument defined: Finale Marching Perc Map, SnareLine VDL1, TenorLine VDL1, BassLine VDL1, and all the patches in the Finale Specific Instruments folder.

Sib VDL Readme – 10 – – Unpitched Instruments

Unpitched Instruments

If you use an unpitched instrument definition that has not been specifically defined to correlate to the library patch file you want to hear the sounds from, you may have some unique challenges in getting Sibelius to correctly interpret your intent. By using the percussion mappings we’ve setup in the VDL Template, you can be certain that not only will the correct sounds be played during playback, but you will also know what it will look like before you even enter any notes into the score. These assignments can be found in the Mapping Diagrams found in the Maps file.

NOTE: A sample Input Map and Mapping Diagram can be found at the end of this section.

When entering notes into unpitched instrument staves with a MIDI keyboard via step-time entry, Sibelius will place the correct notehead on the correct staff line/space for you, simply based on the pitches you’re entering, which is why using a MIDI keyboard can save you tons of time! Additionally, it may be good to know that using the built-in keyboard in Sibelius will get you the same input results.

Below are a few of the important things to be aware of regarding the unpitched instruments we’ve defined in this template.

Articulations

When you get into the mapping diagrams, you will see that only a few of the notes have articulations that are assigned to them. These instrument mappings have been optimized to allow you more flexibility as to whether or not you choose to use articulations in your scores. The vast majority of notes will not require an articulation to be applied for proper playback to occur.

NOTE: In any given instrument, each notehead and articulation combination must be unique on a per line/space basis.

If there are duplicates in the mapping, then the staff will more than likely not play back the way you want. This is a critical aspect of SoundWorld, but if everything is set up properly, it is very user-friendly indeed.

The articulations that may be used in this Template include the following and line up with the picture below from left to right/top to bottom:

Keypad 1: Accent, Staccato, Tenuto.
Keypad 3: Z on stem, 4 Tremolo, 8 Tremolo.
Keypad 4: Custom Articulation 1*, Wedge, Marcato, Staccatissimo, Plus/Closed, Upbow, Downbow, Harmonic/Open.

* The Inverted Mordent symbol is assigned to the first position available of the Custom Articulation spaces (4th keypad, in blue, above the Marcato). This has been assigned this way to help facilitate the crush sounds’ Input Variables. VDL users will need to make sure to not change this setting.

IMPORTANT: In the unpitched instruments’ diagrams, if a note has an articulation assigned to it, this articulation must also appear in your score in order for the correct VDL sound to be triggered.

NOTE: If you want to change an articulation in a percussion mapping to suit your personal preference, make sure that you experiment in a file that you use just for that. Then, if everything goes as planned, you can do it for real in the file you intend to use the change in.

Tremolos

Yellow highlights: In the mapping diagrams, the yellow highlighted notes’ playback will be dependent on the notehead that is assigned to it. So for example, if you’ve entered notehead 0, but the roll you want to playback is assigned to notehead 20, it won’t playback properly until you’ve changed the notehead to 20. At that point you may choose to use any of the tremolo (slash) notation, Z on stem, or none at all. *

The tremolos that can be used with any of the yellow highlighted notes include these (also shown in the following keypad picture).

  • • 4 tremolos (2 slashes)
  • • 8 tremolos (3 slashes)
  • • Buzz roll (Z on stem)


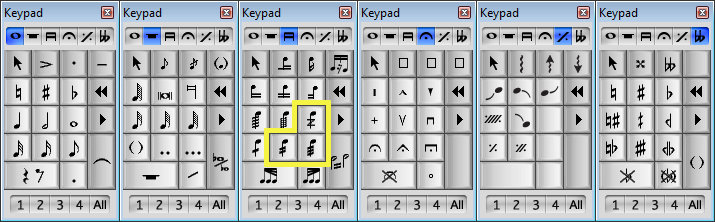
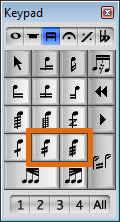
Orange highlights: A few of the instruments have orange highlighted notes in their diagrams. These noteheads REQUIRE either a 2 slash tremolo or a 3 slash tremolo to get that sound (except on the release note of a tied roll). This part of the setup allows the roll sounds to “release” properly without re-triggering at the end of the roll.
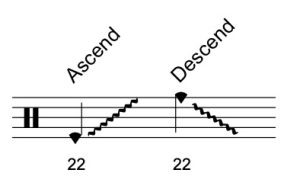
* There are exceptions to the yellow highlight rule. In a few pages we’ll discuss Input Variables.

Controller Changes & Keyswitches

The controller changes and keyswitches that are used in this Template will be processed by the sound set and Dictionary. All you’ll need to do is add the appropriate Dictionary Item to the staff or note and Sibelius will trigger the correct sound for you. Additionally, just changing a notehead to a different number, or moving the note up or down on the staff could also change the sound (view each instrument’s diagram for what is available). The main thing here is that Sibelius does the vast majority of the work for you with just a few simple commands.

Alternate Mappings

Several of the instrument definitions in this Template have been duplicated and their mappings modified so as to give you more options as to the way you notate your music. Each of these instruments’ names has been appended with “(A)” so you can easily spot them in the list. You can view the specific differences between the alternates and their originals by looking at and comparing their individual mapping diagrams.

One example of this is with the SnareLines. Some users like to write their snareline parts primarily on the “A” space rather than the “C” space. The alternate snareline instruments, with their main notation on the “A” space, fittingly are the ones that have the “(A)” at the end of their names. To be aware of the differences between them, and to know which one you need to choose to fit your preference, please reference their diagrams.

Another set of instruments we’ve done this to are from the Cymbals family. The main items modified with these is instead of regular shaped noteheads for cymbal rolls, you can notate them with “x” noteheads. Again, see their diagrams for the details.

Glissandi Markings

There are several instruments in this Template that have glissandi that ascend, descend, move up and down, etc. The notation for these has been designed to be positioned on the staff so that you can add various line markings if you so choose. None of these markings is required for playback, we’re just letting you know that these kinds of sounds have been setup for possible practical use.

Sib VDL Readme – 09 – – Pitched Instruments

Pitched Instruments

Pitched instruments will be a more straightforward than the unpitched instruments and not require as much explanation as to what we had to do to set them up in the Template.

Controller Changes & Keyswitches

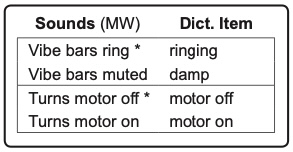
The controller changes and keyswitches that are used in this Template will be processed by the VDL sound set and Template defined Dictionary. All you’ll need to do is add the appropriate Dictionary Item to the staff and Sibelius will trigger the correct sound for you. The Sounds chart to the right is an example of what you’ll find in the Maps file.

Sounds Above the Range

If you’ve been using VDL for a while you may have noticed that there are cymbal sounds mapped above the normal playing ranges in several of the keyboard patches. And if you’re new to Sibelius’ SoundWorld format, you would soon find that accessing them is not quite as easily accomplished as before. However, from now on, when using this Template, all you need to do is simply insert an Instrument Change into the staff and choose one of the many cymbal options from the Cymbals Family.

Sib VDL Readme – 08 – – Overview

Overview

Each pitched instrument listed in the Maps file will have the following (if applicable):

  • Keymap – Shows the trigger range of the patch file; also used for note input.
  • Sounds Chart – Shows what sounds are available and what Dictionary Items access them.

Each unpitched instrument listed in the Maps file will have the following (if applicable):

  • Input Map – These are very similar to the keymaps except that the layout may have been modified for the sake of user friendly unpitched instrument note input.
  • Mapping Diagram – Shows how the unpitched instrument has been mapped within Sibelius.
  • Input Variables – Gives the user more flexibility when entering notes for unpitched instruments.

Sib VDL Readme – 06 – – Adding Instruments to the Score

Adding Instruments to the Score

After you’ve opened the .sib file named “VDL_Template_7.0a”, navigate to Home > Instruments > Add or Remove; the dialog box that appears will look similar to this:

Select the “- VDL Template 7.0a” Ensemble from the Choose from drop down list. Open the Family you want to choose the instrument from (Cymbals in the image above), find the instruments(s) you would like to add to the score, then do so.

After you have filled up the Staves in score field, you can order them however you wish by using the Up/Down buttons. Click OK when you are done playing around in this dialog.

Sib VDL Readme – 05 – – Playback Configuration

Playback Configuration

Once the software has loaded, navigate to Play > Setup > Playback Devices. One of the first things you will need to do before you open the Template is set up a Playback Configuration.

  1. Click on the “New” button.
  2. Name the new configuration to suit your liking.
  3. Activate Kontakt Player. Double click the field under “Sound Set” to get the sound set drop down menu, select the VDL SoundSet 7.0a sound set.

In order to help you find the required sound set in the Sound Set drop down menu, we modified the name in regards to how it will show up in Sibelius. Be sure to select and assign the sound set labeled “VDL SoundSet 7.0a”.

Using Multiple Libraries

When using more than one template from The Write Score, you will likely need to have your configuration setup a little differently than described above. For an example of what it would need to look like, please read the Post-Merge Checklist / Playback Configuration section in Appendix D.

IMPORTANT: For the best results, each instrument that you use from this Template should have their Device and Patch assignments in the Mixer both set to (Auto). The custom instrument definitions and sound set will do all of the correct patch loading for you. (The Sib 6 Mixer looks different, but the same applies to it as well.) You shouldn’t ever need to manually set them to (auto) as this is the state that Sibelius gives each staff by default.

Kontakt Player

In case you missed it on the previous page, here are our notes concerning the various versions of Kontakt Player and what your options are for using them in the differing versions of Sibelius.

  • Sibelius 8+ will only see VST/AU plugin files that are 64-bit.
  • Sibelius 7 64-bit will only see VST/AU plugin files that are 64-bit. One of the 64-bit versions of Kontakt Player 4 or Kontakt Player 5 will be needed to utilize VDL while Sibelius 7 is in 64-bit mode.
  • Sibelius 7 32-bit will only see VST/AU plugin files that are 32-bit. All three 32-bit versions of Kontakt Player (2, 4, 5) can be used within this version of Sibelius.
  • Sibelius 6, 32-bit only. Kontakt Player 2 or Kontakt Player 4 can be used in this Sibelius version. KP5 is not compatible with Sibelius 6.

IMPORTANT: All instances of Kontakt Player in the Active Devices column that are used for Virtual Drumline need to have VDL SoundSet 7.0a assigned.

Kontakt Player is available as a free download. Please visit this TWS forum topic for instructions on obtaining the KP version best suited for your setup.

RECAP:

    1. You’re running one of the following versions of Sibelius:
      • Sibelius 7 or higher (includes Ultimate)
      • Sibelius 6.2
    2. You’re running the latest version of the VDL library
    3. You’ve installed the VDL sound set (“VDL SoundSet 7.0a”)
    4. You’ve created a playback configuration that will use this sound set.

With the above steps completed, it’s time to open up the Template and get working!

Sib VDL Readme – 04 – – Your Writing Environment

Your Writing Environment

Items that you will need to have before you can start using this Template:

  1. Sibelius 6, 7, or higher (includes Ultimate, etc)
  2. Virtual Drumline 2.5, library version 2.5.5

Install Sibelius

Whether you are upgrading or buying new, you can find the Sibelius software main web page by following this link: https://www.avid.com/sibelius

Once you have Sibelius installed, be sure to update to the latest version. https://my.avid.com/account

If using Sibelius 6, you’ll need to be sure you’re using the latest update for that version (use the Avid account link above to download it):

  • Sibelius 6, version 6.2

Install Virtual Drumline

Install the VDL library from the installer (from disc or download), then go here to make sure you’re using the latest update: www.tapspace.com

The latest VDL library update is 2.5.5. VDL 2.5.5 is REQUIRED in order to make use of all the instruments defined in this template.

Install Template Sound Set

Find the file labeled VDL_SoundSet_7.0a.xml and copy it into one of the following folders * (this file is included within the VDL Template zip package you downloaded):

Windows 7 / 10 / 11:
Sib 6: C:\Users\your username\AppData\Roaming\Sibelius Software\Sibelius 6\Sounds
Sib 7: C:\Users\your username\AppData\Roaming\Avid\Sibelius 7\Sounds

macOS:
Sib 6: /Users/your username/Library/Application Support/Sibelius Software/Sibelius 6/Sounds
Sib 7: /Users/your username/Library/Application Support/Avid/Sibelius 7/Sounds
Sib 8+: /Users/your username/Library/Application Support/Avid/Sibelius/Sounds

* If it’s not already there, you’ll need to create the Sounds folder yourself.

Why do I need this particular sound set?

  1. A sound set is an XML file that has all of the relevant information allowing Sibelius to communicate with whatever library/device the sound set is written for. In this case, the VDL SoundSet 7.0a sound set will allow Sibelius to correctly sort out all the instruments, techniques, articulations, controllers, and keyswitches for every instrument in the Template.
  2. This sound set has been customized to distinguish itself from any other sound set that a user may have in use in a particular Playback Configuration. We want specific patches to be loaded – especially if other sample libraries are in simultaneous use.

NOTE: Make sure that you install and use the sound set that you downloaded with the Template so all the instruments that we’ve defined will function properly.

Now that you have installed Sibelius, Virtual Drumline and the included sound set, let’s set up your Playback Configuration.